Christiane Holmquist Landscape Design

  • Home
  • Portfolio
  • Projects
  • How I work
  • Resources
  • Blog
  • About
  • Contact

A Bench and How It Came to Be

August 3, 2017 By Christiane Holmquist

A Bench and How It Came to Be _ 1

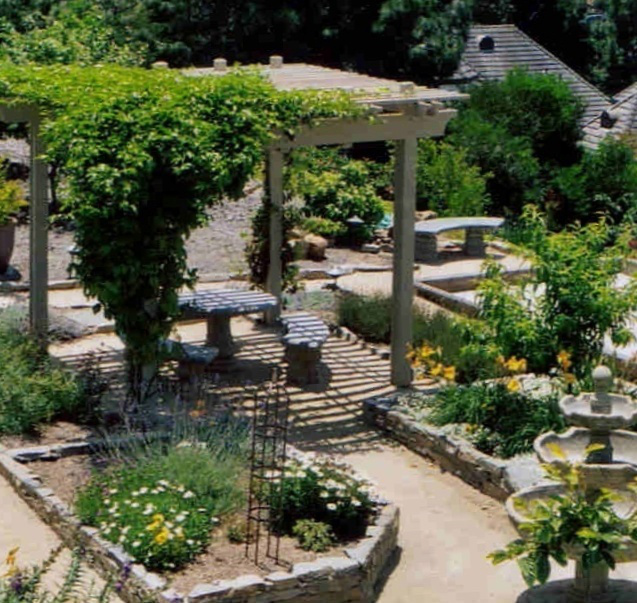
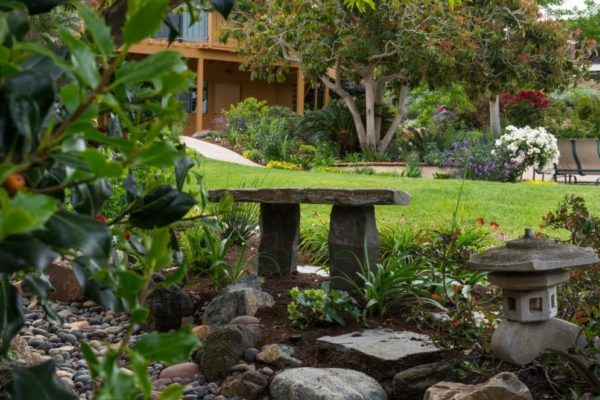
The basalt bench in the shade of the Macadamia Nut tree is Gordon’s favorite spot in his garden.

Authors: Christiane Holmquist & Gordon J.
Photography: Emma Almendarez

A recent project amazed me in its rapid flourishing and the joy it brought me and the homeowner. Planting started in early January of this year, and by May the garden was awash in butterflies, birds, and bloom, surprising and delighting us all. The homeowner was so excited that he volunteered to give me his view of our collaboration, and I gladly reprint here his words, with my picture comments:

A Bench and How It Came to Be -2

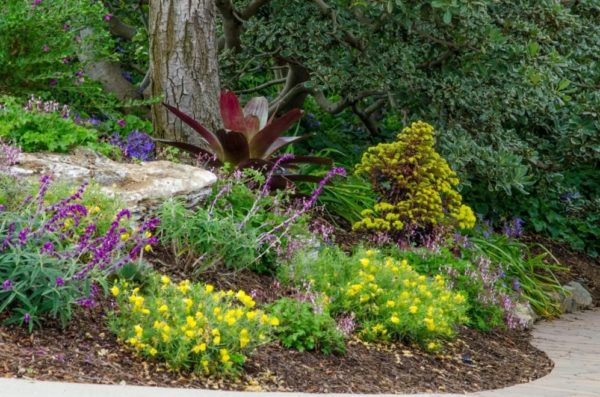
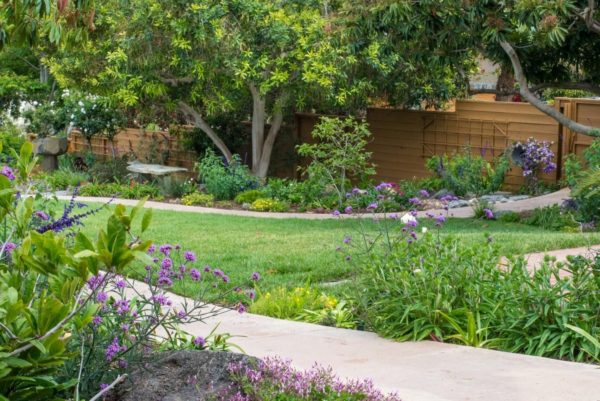
The garden had “good bones” in the form of expertly pruned mature trees, Variegated Mock Orange and Indian Hawthorn. However, on the ground plane I replaced a tired lawn, Agapanthus and Star Jasmine with colorful, low-water use perennials, succulents and a few exotic and unfussy terrestrial bromeliads Vriesea imperialis. We added boulders for permanence and welcome texture contrast.

A Story of a Bench

“As a homeowner, I always thought that the best project outcomes occurred when there was a strong collaboration between the design professional and the homeowner. To illustrate, here’s the tale of a bench and how it came to be.

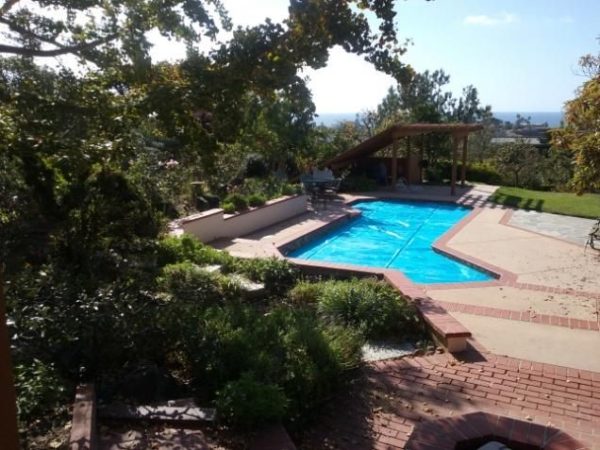
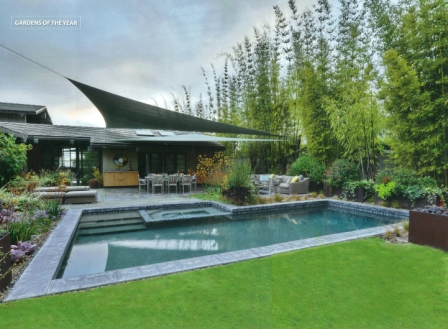
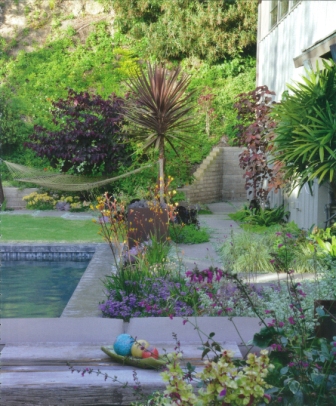
The pool was “just there”, and the surrounding planter beds were in need of fresh color.

Me– an elderly gentleman, AKA “the client.”
Christiane Holmquist–AKA Christiane Holmquist Landscape Design

My wife and I bought our home in 1980, which was 3 years old, but totally lacked landscaping. Using design professionals, we landscaped our property–pool, spa, patios, trees, gardens, etc.  We planted a wide variety of trees, including a gingko, macadamia nut, bronze loquats, citrus, Chinese fringe trees, paper barks, magnolias, cassias, etc.

A Bench and How It Came to Be -4

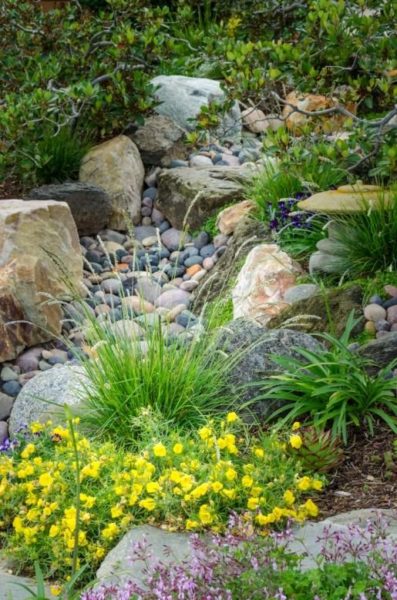
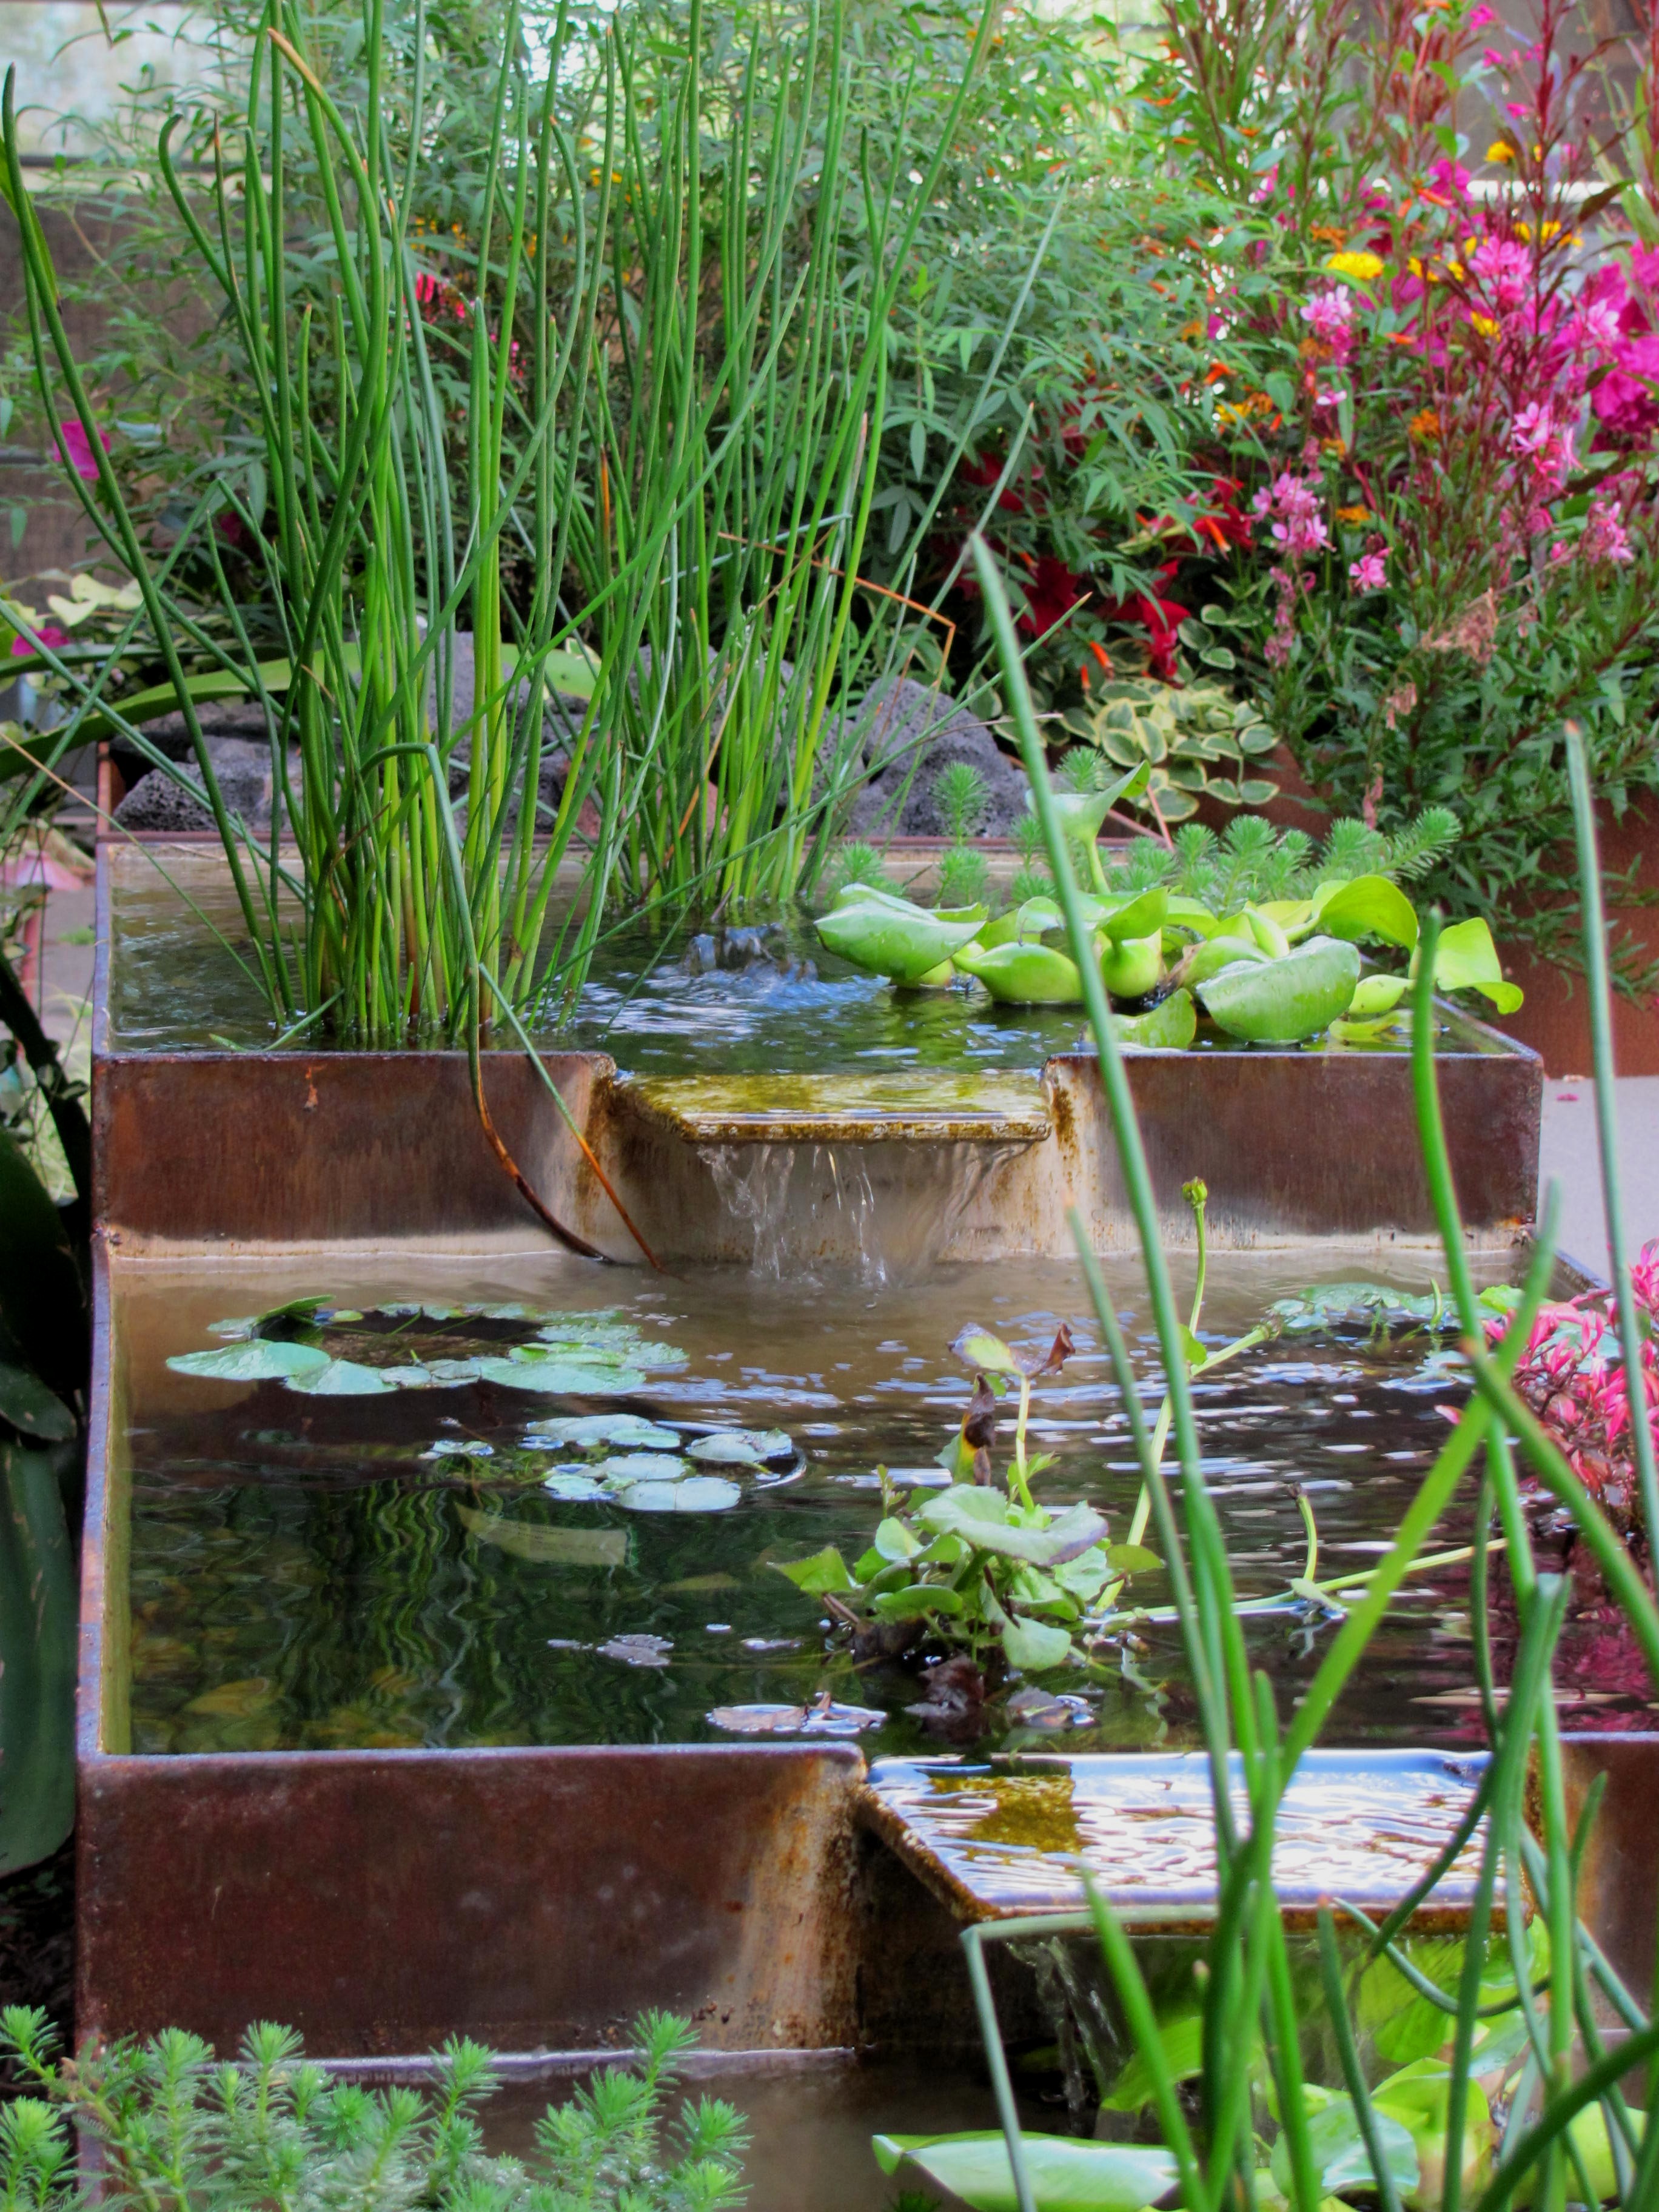
To rebuild the old dry stream beds, we repositioned the original feather rocks and incorporated many new boulders, pebbles, and gravel with interesting forms and textures. We added many smaller grasses and “water-side” plants, to imitate a mountain stream as convincingly as possible.

As the decades rolled by, the trees became lovely and mature and, correspondingly, we became mature (80+ and counting) (but lovely would be a real stretch). Therefore, with age, we focused on landscape seniorization–how to enjoy and work in the gardens while also minimizing the risk of falls.

A Bench and How It Came to Be-5

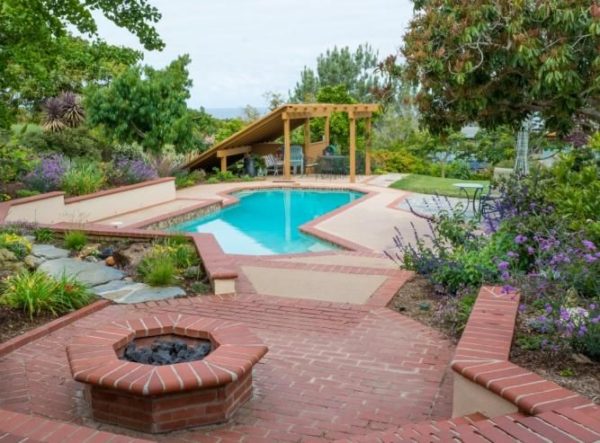
Much needed color invigorates the pool area and weaves throughout the garden.

One small seniorization action was to install large stone steps between a concrete walkway and a dry streambed. It gave access to the area and with the solid steps, the risk of tripping or falling was minimized.

A Bench and How It Came to Be _ 6

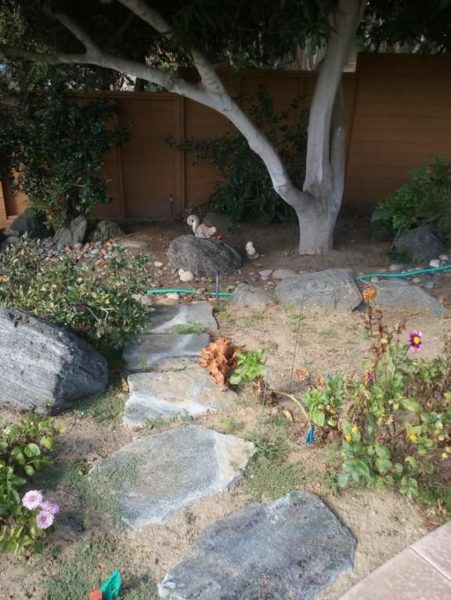
Stone steps ended at the dry stream bed. Wouldn’t it be more satisfying to rest here in the shade of the tree, to view the garden?

Next Steps

Enter Christiane.  She observed that the garden had “good bones,” meaning that the mature trees and shrubs anchored the new more modern usage of low water plants and native plant material. However, when it came to the stone steps she said, “You can’t have a walkway without a destination! It needs a bench to sit on across from the streambed.” I noted that the spot she was talking about was just beyond a major branch of the macadamia nut tree that I was likely to bump my head on and the bench would be in deep shade.  I nixed the idea.

Christiane and I moved onto other elements of the design project  —  plant species, availability, etc.

A Bench and How It Came to Be _ 7

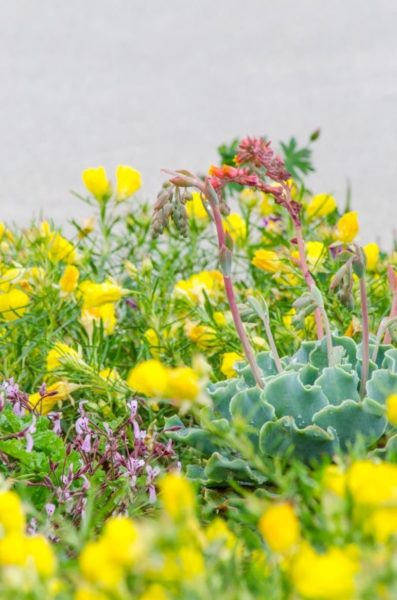
Echeverias nestled into ever-blooming Sundrops Calylophus drummondii and ‘Pink Spice’ Pelargonium ionidiflorum. You will find these plants often in my designs; they are absolutely dependable, easy going and low-water use plants.

Weeks later, Christiane came back to the idea of a bench. She suggested that it be placed in front of the streambed, but still under the canopy of the macadamia nut tree. This time I was able to picture it–a big stone slab resting on two stone pillars that fit two people comfortably. By now I have lots of confidence in Christiane’s judgment and design strength. Also, the masonry people had done a great job building a new wall. So, let’s do it!!  In goes the bench. It made the nearby birdbath look out-of-place. So, in goes a large stone birdbath in harmony with the bench.

You will find these plants often in my designs; they are absolutely dependable, easy going and low-water use plants.

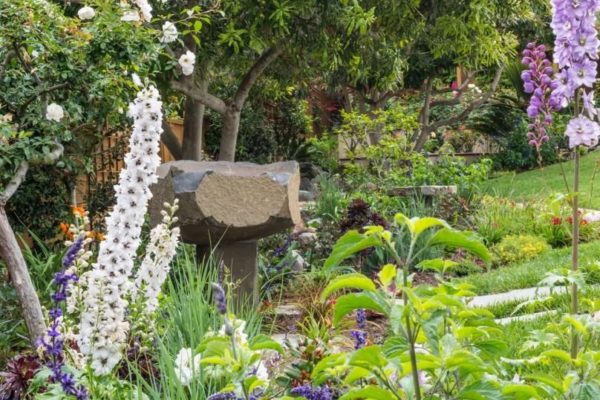
The Basalt birdbath add to the aged look of this garden.

Fast Forward a Few Months

The stone bench and birdbath are the feature attractions of the center of the gardens.  The bench is my favorite spot.  One can watch the butterflies–monarchs, swallowtails, sulphurs–fluttering in the sunlight and the birds– sometimes chirping away, sometimes silent, sometimes bathing–enjoying the yard. The bench is a great place for conversations with others.  It’s a great place for visitors to enjoy the gardens. A great place for memories.

A Bench and How It Came to Be _ 9

Many years and much creativity went into this garden, and various people have shaped it. The bench invites to sit and contemplate its history and present beauty.

Thank you, Christiane, for your insight and your persistence.
Sincerely,  Gordon.”   (End of quote).

A Bench and How It Came to Be _ 10

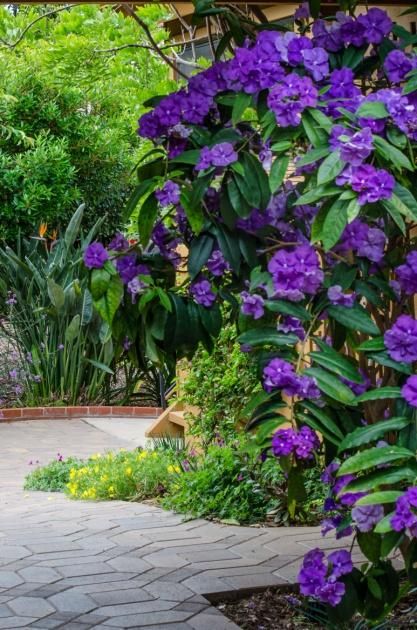
A Brunfelsia in full bloom is a stunning attraction in this entry courtyard.

Heartfelt thanks to you, Gordon; I much enjoyed working with you!

Gordon’s comments reinforce my love of helping homeowners see the strengths and weaknesses of their existing gardens, and of developing landscape design plans for their improvement, while keeping the client preferences in mind. With Gordon’s detailed involvement we found exceptional plants that bring life to “good bones” and produce enjoyment year round while keeping the upkeep to a minimum. A project like this teaches me a lot about gardens and how to make them better; it fuels my work and propels me on … to the next garden.

A Bench and How It Came to Be _ 11

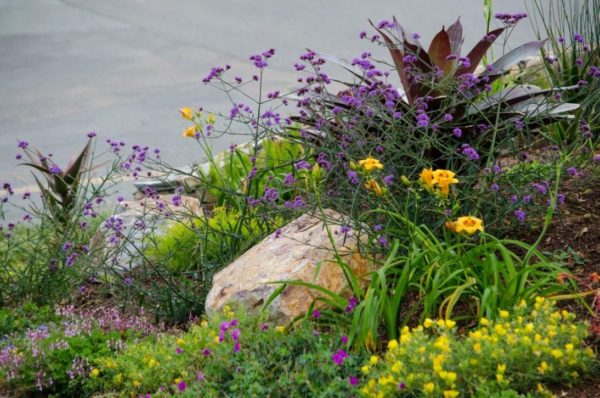
Verbena bonariensis ‘Lolly Pop’, Geranium sanguineum, Sundrops Calylophus hartwegii, Vriesea imperialis, Daylilies. A few very commendable plants for low-maintenance and low-water needs gardens. And don’t forget boulders!

Save

Filed Under: Backyard Landscape Design, Drought Resistant Plants, Landscape Design, Low Maintenance Plants Tagged With: backyard landscape design, diy landscape design, drought resistant landscape design, low water landscaping

Out Of The Sun and Into The Shade: Design Innovations For Comfort In The Shade

November 26, 2013 By Christiane Holmquist

Pergola for shade

While searching for a solution for an uncomfortably hot and tricky situation at one of my projects, I felt that sharing my considerations might be helpful for other homeowners:  We all love the idea of extending the hours spent outside in the garden, away from the hot sun, and there are multiple options available, depending on taste, needs and budget!

Here’s a description of the issue that prompted my research:   At this residence, the owners have a pool whose design creates a difficult-to-shade lounge/dining area on the pool deck:  A few steps up from the pool deck, tucked in a corner behind the spa, the lounging area had probably been originally a sun deck, but later the new owners wished to have a dining area here, and a gazebo was added to shelter the diners.  Today, with modern style calling for bigger furniture, the homeowner noticed that the placement of the gazebo’s posts limits the usable space under its roof.  What’s worse however, is that in the late afternoon the sun angle makes sitting here uncomfortably hot.

What are the homeowners’ options for a more comfortable dining room here? For those of my readers who know my previous post it comes as no surprise that my first thought was of using shade sails. Their flexible layout and playful character had me fall in love with them, and in certain situations, such as in the garden below, they provide the perfect solution to the shade needs, especially when surrounding structures allow to attach the sails, reducing the required number of posts. [Please see a quick review of some basic facts about shade sails at the end of this post.]

shade sails for shade protection 2

Regrettably, in my present project shade sails were not an option:  For one, its design would have felt a bit “out of sync” with the classic, traditional almost Cape-Cod-feel of the residence. Moreover, attachment to the house isn’t possible as it’s too far away, and the required high tension can’t be achieved with very long cables.  To install a sail would have required poles right next to the spa and the diners, on the pool deck  -  a situation that we all found too awkward.

It would have been too easy… [By the way, an excellent source for do-it-yourselfers of the entire shade sail package, information, and how-to videos, is at Shazeebo in Carlsbad, and at Shazeebo.com. Here the intrepid can find lots of information about how to install these airy objects.]

Another attractive way to provide cool shade for loungers or diners are structures made from wood or aluminum components and covered with durable Sunbrella® fabric. With curtains and retractable roofs “Pavilions provide more than just shade —  they provides the ability to create an outdoor enclosure, protected from the elements.“ Also: These canopies, with their choices of style, color, and foot print can bring an element of elegance to a garden.

shade pavilion

The pavilion above has been placed on extended footings, beautifully decorated by the owner herself, to provide extra head room. With the house color matching the canopy it feels like an extension of the house.  (Cuscini pavilion; custom posts/pillar combination)

What about a wood structure, perhaps with shade fabric mounted underneath, like this one?

wood structure with shade

The lounge room created by this shade structure really looks inviting:  The rolled-up fabric panels can be lowered to cut out the late afternoon sun, or folded aside if needed, and the spacing of the posts accommodates the lounge chairs without hindering people from moving around underneath. A layout like this requires generous garden space which is available here.

The cost for a wood pergola is about $30 – $35/sq ft without shade panels that can be fitted underneath the structure (here the 2nd lattice/cable frame underneath the top lath structure).  Maintaining a wood structure means painting or staining regularly; the fabric panels need to be power washed occasionally.

For our project, we know that a structure like the one above can take different shapes, and although our pool deck doesn’t allow a rectangular structure, a fan-shaped one could fit here. The strongest argument against a fan-shaped pergola is that we’d have a “forest of posts” to carry the necessary spans between them. And this idea doesn’t seem appealing…

For my present project, the next option we considered was a parasol with ‘tiltable’ canopy.  It’s exciting to see how the interest in outdoor living and comfortable shade rooms has pushed the advancement of the “shade technology”, and there are quite a few brands available of single cantilever parasols of sturdy quality and contemporary design.  One of them is Treasure Garden that offer various umbrella types and sizes that can be rotated and tilted in a few pre-set angles and whose sun-rated fabrics can be chosen from 11 different manufacturers. As their website promises: “Having the proper shade elements can lower summertime temperature up to 20 degrees allowing for more enjoyment.” http://collections.treasuregarden.com/prototypes?option_desc=Cantilever

Treasure Garden cantilever umbrella with valence

Bingo!  For our situation, this type of outdoor shade structure looks like it will work: The 13 ft diameter umbrella would comfortably shade our pool deck, and the single post can be in the corner, bolted to the concrete deck. Besides rotating the canopy by 360 degrees, it can be tilted towards the afternoon sun (valences should increase the sun protection).  I feel that this design is classic and elegant and would just work with the residence’s architecture and the materials and design of the pool area. In the next couple of weeks we’ll check out the parasols, and the owners will make a decision.


(This friendly reminder is offered by Jez Stratton of California Sail Shades at www.CaliforniaSailShades.com)

Here’s a repeat of some basics for shade sails:

  • Steel poles can be around $1,200.00 each installed.
  • House connection points are $350.00 each installed
  • 20’x20′ custom shade sail would be $2,600.00 installed.
  • Protection from UV rays (some fabrics offer up to 97 % UV protection);
  • Custom designed to fit the project’s requirements, in triangle, or trapezoid/square shapes (some standard sizes are available);
  • They represent cool landscape ideas that add value to the home and attractiveness to the landscape;
  • They can serve as vertical screen to increase privacy or block out a bad view;
  • They can be designed and installed to withstand high wind ratings.
  • Low maintenance: Yearly washing is recommended (some installers offer this service).

“Maintenance: Pretty much trouble free: They can gather airborne pollution which will dull the color over time. I don’t recommend using a white shade cloth if it’s close to a freeway for example as it will become grey and dingy rather quickly. They are relatively easy to clean using a power washer from below and as the cloth is essentially plastic dirt washes off quite easily.

Fading: The top of the sail will fade over time, again darker colors are more prone to this, but far less than most other outdoor fabrics such as Sunbrella.

Lifespan 10 years +  : When installed properly (i.e. under very high tension to prevent flapping and mechanical wear) they can last 10 years plus in most circumstances and remember the sail itself is generally only 25% of the total cost of installation so replacing it is not too expensive.

UV degradation warranty:  All sails carry a UV degradation warranty. We also insist on using Tenara thread which is made from PTFE (Teflon) which is virtually indestructible by UV. Many other shade sails use a polyester thread which can weaken after a few years due to UV which limits the service life of the sail if the stitching fails!

The late afternoon is always a challenge due to the setting sun and can only be overcome by extending the reach of the sail further west or as you suggested lowering the sail. This often conflicts with a customer’s view which creates issues as well. Finding the right balance is the challenge but remember the shade structure allows you to venture out during the day also. Generally speaking you can reduce the temperatures by 20º during the heat of the day under a shade sail.”


Filed Under: Backyard Landscape Design Tagged With: backyard design for shade, lndscape designer san diego, Shade sails, shade structures

From Boring Yard to Garden Joy: Six Steps to Help You Create Your Dream Landscape Design (Part I)

September 30, 2013 By Christiane Homquist

Rachel's outdoor living area Are you dreaming of a peaceful, functional and relaxing outdoor living space?

One that you want to spend every free minute in?

For a successful home landscape design that brings you enjoyment, peace and comfort, take these ingredients:

  1. Dream it (and now’s the time to pull all the stops)
  2. Determine your needs (i.e. what you can realistically do);  assign required space dimensions to each element
  3. Define your style
  4. Draw a plan (or get landscape design help)
  5. Remove and keep only what’s desirable (f. ex. a shade tree) and put it all together
  6. Enjoy!

It’ll work for you, too, with this recipe!  Here’s how we did it for Rachel’s garden:

Grasses soften the edges of the walls1. Dream it 
When I first met Rachel she had come with her garden club to visit a garden that I had designed. She complimented me on the beauty of the design and asked if I’d be interested in helping her with her yard:  She didn’t think much could be made of it since it was so small, but could I come to see it anyways?

Rachel, at her wonderful age of 83, is a very active member in a few different clubs, and as we talked it was apparent that she had a clear idea of what she dreamt of:

  • Have more friends over and entertain them in her garden.

She hoped for a space in her garden in which to serve some light foods and drinks, surrounded by color and beauty.  The lawn wasn’t comfortable anymore to walk on, and over the years the shrubs had been disfigured and pruned into boring blobs; many had just disappeared and had never been replaced.

  • Where would I create this entertainment space, since the yard was so small?
  • And would there perhaps be room for a lounge chair in a reading nook?
  • And could she have a fountain, or other water feature?
  • And would we have enough room still for many flowers and interesting textures?
  • The entire yard was enclosed by a 5 ft wall not high enough to block out the neighbor’s window.  Could we make the garden more private without blocking her view of the ocean?

A comfortable chaise-lounge invites to reading and dreaming

2. Determine your needs (i.e. what you can realistically do);  assign required space dimensions to each element

The first thing I asked Rachel was to define and tell me about how she planned to entertain her friends:

  • Would she want to sit down at a table and serve food there?
  • And how many people would she like to seat?
  • And where would the food be served from, since the main kitchen was upstairs, on the first floor?

We determined that she wasn’t going to serve hot food but only salads and finger foods prepared in the smaller downstairs kitchen in her guest apartment. This way she wouldn’t need any tables to sit down as most people (mostly groups of up to 10 to 15 people) would be standing or strolling through the garden; some seating could be provided with benches.

(Note: To seat 4 people around a table we would have needed at least 10 sq ft ; this seems to be the bare minimum, and if you need circulation space around it or your chairs are a bit oversized, 14 sq ft for this dining area would be needed.)

However, to accommodate these groups, two “entertainment” areas would be best, and I suggested to allow for each about 12 x 12 ft : This would allow room for benches, some additional (temporary) seating if necessary, and still have enough planting space around them to soften all.  Also, these spaces would need to be connected with easy pathways.  (Inviting people to stroll from one area to the other would be a perfect way to display plants to be discovered on the way.)

Since most of her friends are elderly, the pavement under foot needed to be safe, which in my mind excluded any materials with uneven surface such as flagstones or gravel.

This left stabilized/compacted DG (decomposed granite), concrete, tiles and interlocking pavers; which one would we be using?

A plain as-is 3. Define your style

Examining her house and garden for elements that would help define the style of this new backyard landscape design, I noted these clues:

  • The main assets of the existing garden were a mature Pine tree in the corner that provided lovely shade (unfortunately pruned very unprofessionally but not beyond repair); also two mature fruit trees in the other corner, and a beautiful view of the ocean, in between a couple of roofs in the neighborhood. We would try to keep the mature trees.
  • Enclosing the garden was a 5 ft wall that had the potential of making it more private if it could be raised in a few critical areas?
  • Architectural style:  Her house is a Southwest/Perceived Spanish 2-story building with white stucco and red tile roof, and an upstairs balcony from which she views her garden and the ocean.
  • There was an existing, albeit small patio paved with grey concrete; any new pavement would need to harmonize with it since we there was no budget to remove this pavement.
  • About Rachel’s preferred style:  The strongest clues as to Rachel’s taste were, as with so many design clients, visible inside the home:  She loves Mexican and Southwestern art, as displayed everywhere in terracotta tile floors, furniture, colorful cushions, glazed ceramics, paintings and souvenirs from the Southwest. Red tile was used everywhere, and the walls surrounding her garden are reminiscent of a Spanish courtyard whose surrounding walls allowed a beautiful view of the ocean.

We have now assembled the first ingredients of this recipe .  For how to put them together for your dream garden, please read my follow-up post.

Filed Under: Backyard Landscape Design, Drought Resistant Landscape, Landscape Design Projects, Low Water Landscape Tagged With: home landscape design, landscape design, landscape design help, landscape design ideas, outdoor living space

As Fall Brings Harvest, and Score Yields Music, So Does Design Yield Award!

September 28, 2013 By Christiane Homquist

(Regarding my “Gardens of the Year Award” in Eva Ditler’s article
“On key”, in San Diego Home/Garden Lifestyles, September 2013. 

Photography by Martin Mann, Patricia Bean/Expressive Architectural Photography and Christiane Holmquist

  Garden of the Year Final _3

Finding the beautiful photos of my award winning design in the San Diego Home/Garden Lifestyles magazine and reading Eva Ditler’s melodic description of the garden gave me a jolt of pride and delight. It’s with amazement that I realize how many talents went into the creation of this article:  My client Melissa’s almost lyrical explanation of the garden and reference to the music she “hears” in it and that went into its creation; the writer’s skill that gave such a pleasing and expressive rendering of it; the photographer’s craft in capturing the light and atmosphere of the garden; and the experience, focus on detail and enthusiasm that went into the design.

Yes, and music (as the article refers to): Perhaps, with my love for it, I grasped what Melissa had in mind and was able to create a “melodic landscape garden that takes its cue from music” and that is so enjoyable. And during the creation I enjoyed the exploration of exceptional materials, the symphony of colors, and the concert of ideas between me and Melissa like two instruments playing together.

I deeply appreciate the opportunity to work with her, as I appreciate the award and the coverage of it in San Diego Home/Garden Lifestyles.

Garden of the Year 2013 in late afternoon

All of this is impacting my understanding of what I do and where I have arrived, after 15 or so years in this craft.  Designing a garden is risky endeavor:  When I design something, I base it on the client’s mostly verbal description of the desired garden.  At the time of presentation of the design this vision exists only in my own mind; by sharing it with the client, I hope to communicate this vision to her, and, in doing so, expose myself to her “verdict”: Did I capture her description and the desired mood?  Can I communicate, with my craft, my vision, and will she agree with it? Can I then follow where she wants me to take the design and get even more into her head, while applying my own design principles?

GOY 2013 with steel fountain

The present design is one very individual response to a particular set of challenges and demands. However, its results and appeal are based on the same principles that must be applied to all designs and that, as they are applied to a different set of challenges and demands, will create a very different garden and feel:  It’s the balance of hardscapes with living plantings; the juxtaposition of delicate foliage and intriguing materials; the functionality of spaces and the harmony of colors that result in a garden that is useful.  This will be a garden that is deeply satisfying to live in, and that everybody can enjoy.

A big thank-you to the judges that voted for me!

GOY 2013 Award

Read more about this garden in my earlier post “Joint Venture in La Jolla”.

MORE GARDENING & ENTERTAINMENT NEWS:

The Water Conservation Garden in El Cajon/CA is a place that I cherish as place of fun, entertainment and education on water conservation and sustainable landscape design. It offers 5 acres of displays that are easy to walk and explore and that are filled with great drought resistant plants and educational displays of landscape materials.  It offers classes on all manner of landscape issues.  Other events offer landscape design help that can make life easier for novices or those that are into DIY landscape design.

The WCG will celebrate its “Fall Plantstravaganza” on Nov. 2, 2013, from 9 a.m. to 3 pm.  These events have always been highly educational and entertaining to all gardeners and those who love plants and landscapes. You can even buy exceptional drought tolerant plants here and bring your questions to the horticulture “experts”, such as vegetable and Master Gardeners, arborists, and representatives of water authorities; and you can schedule a low-fee consultation with a design professional.  (“I’ll be one of those professional landscape designers here; I also offer classes here and 1 hr consultations.)

Don’t forget to mark your calendars  –  hope to see you there!

Filed Under: Backyard Landscape Design, Drought Resistant Plants, Landscape Design, Special architectal landscape elements, Water Features for Gardens and Yards Tagged With: diy landscape design, drought tolerant plants, Gardens of the Year award, Landscape design awards, landscape design help, professional landscape designers, Sustainable landscape design

Search our blog articles

Get your free eBook “15 Things To Do Before You Hire A Landscape Designer”

Blog Contents

  • Backyard Landscape Design
  • Container Gardening
  • Drought Resistant Landscape
  • Drought Resistant Plants
  • Gardening tips
  • Landscape Design
  • Landscape Design Portfolio
  • Landscape Design Projects
  • Low Maintenance Plants
  • Low Water Landscape
  • Outdoor Kitchen
  • Places to visit
  • Rocky Mountain landscaping
  • Shade Structures
  • Special architectal landscape elements
  • Sustainable Landscape Design
  • Trees
  • Uncategorized
  • Water Features for Gardens and Yards
  • Xeriscape designs

Blog Index

backyard landscape design diy landscape design drought resistant landscaping drought tolerant gardening drought tolerant landscape design drought tolerant plants drought tolerant shrubs drought tolerant trees dry climate design front yard landscape design garden design gardening ideas home landscape design irrigation restrictions in Southern California landscape design landscape design consultations landscape designer San Diego landscape design help landscape design ideas landscape ideas landscaping in San Diego County lawn removal limited water resources low-volume water features in the landscape low maintenance plants low water landscape low water landscaping Mediterranean-type plants perennials residential landscape design Shade sails sustainable garden design Sustainable landscape design trees useful tools for the water-wise gardener water-wise landscape design Water Conservation Water Conservation Garden Water Conserving plants xeriscape xeriscape design xeriscape designs xeriscape landscaping xeriscape plants xeriscape San Diego
Christiane, your design is beautiful. Viewers love the design and color. Thank you so much for all your support while the project was being developed. It would have been more stressful for me had you not held my hand regularly.

Rachel Michel

CHRISTIANE HOLMQUIST LANDSCAPE DESIGN


Download my article published in San Diego Home and Garden Lifestyles Magazine!
Contact Me I offer phone and/or onsite consultations and landscape design.

Phone: 406-246-6065

Latest Articles

  • Winter landscaping with Billie Gray : A lifelong love affair of gardening in the Rockies
  • Portfolio: Gardens with Water Features
  • Portfolio: Arbors And Dividers
  • Starting my new life in Montana
  • A Bench and How It Came to Be

Connect with me

  • Facebook

Copyright © 2023 · Agency Pro Theme On Genesis Framework · WordPress · Log in